Adding An Island to An Older Home in Tallahassee
McManus Kitchen and Bath provides a single place where you can work with interior design and construction professionals who can help you create a happy, healthy home. We start each project with a Design and Budget Consult. It will help you clarify your design ideas, understand the remodeling process and create a Good Better Best Budget for your project. Click Here to Schedule a Consult
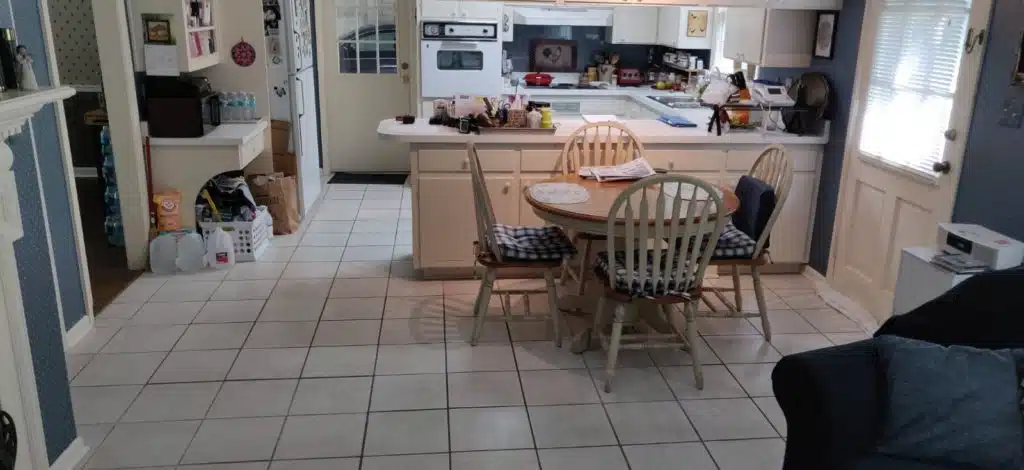
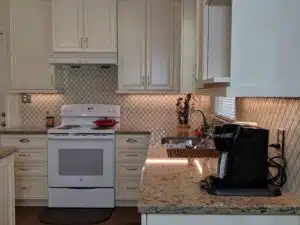
This home was built in the 1970’s and the kitchen had not been updated since it was built. It had held up well but the layout was not the best and the finishes were definitely worn. The home owner wanted to keep a traditional look to match the rest of her home and wanted new white appliances.
Project Cost Details
Original Good Better Best Budget: $59,933.00
The Good Better Best budget was developed at our very first showroom meeting. We then refer to the budget throughout the design process to help keep things on track and to make sure any cost increases to to material choices or changes in the scope of work are well thought out.
Change Orders: $3,030.25
Changes orders are a necessary part of the remodeling process. There are a few types of change orders that can come up during a project. The most common is the Customer Requested Change Order or “while you are here” change order. These are items that the client chooses to add to the scope of work as part of the project. Another type is Unforeseen conditions. These are less common but can occur when wood rot or improper work is found after demolition.
On this project the customer requested a couple of change orders and we had a small change order due to unforeseen conditions (explained in the Challenges section of this post)
- Customer Requested Change Orders:
- Strip wall paper in living room and paint living room walls and bookshelves: $2635
- Tile fireplace surround and hearth: $193.75
- Unforeseen Conditions Change Orders
- Additional drywall work: $201.50
Final Project Cost: $62,963.25
The final project cost would up about 5% more than the original budget due to some customer requested changes. The changes the client requested were smart ones though and things we had discussed during the design meetings. They decided to wait until after demo to make a decision on the extra work just in case there were any unexpected costs due to unforeseen conditions (a smart idea if you’re updating an older home)
Problems That Needed Addressing
The before picture above shows a few of the issues we needed to address in the remodel including:
- The peninsula made the kitchen feel small
- The upper peninsula cabinets closed the the kitchen off from the living room.
- The tall oven cabinet next to the cook top left no counter top space to the left of the cook top
- The desk area was not useful
- The range hood did not work well and was not vented to the outside
- The wall paper was out dated and made the kitchen feel dark and gloomy
- The cabinet finish was worn and hard to clean and laminate counters were worn
- The cabinet drawers had only 3/4 extension glides and the cabinet frames wasted a lot of space
- The tile flooring was old and needed to be replaced
Design Solutions:
The homeowner felt she really needed a wall oven but after showing her some design options with a slide in range and open counter space the to the left of the cook area she fell in love with the idea. She did not bake or use the often often and the wall oven was taking up a lot of space.
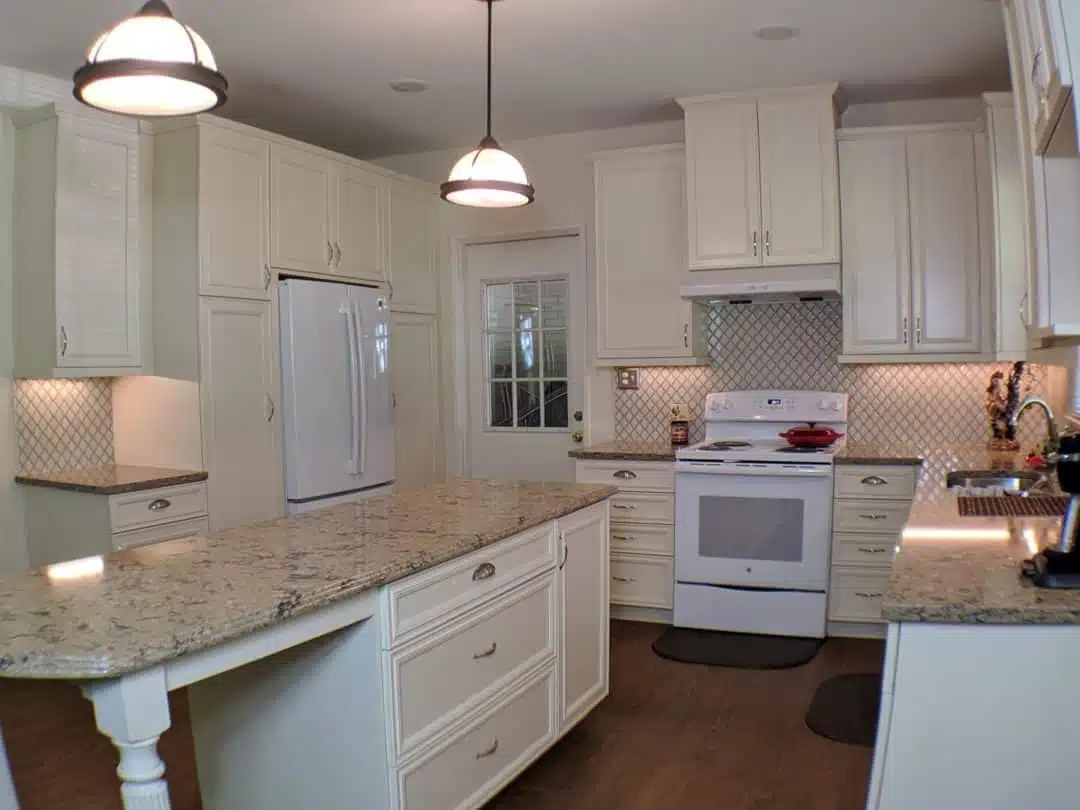
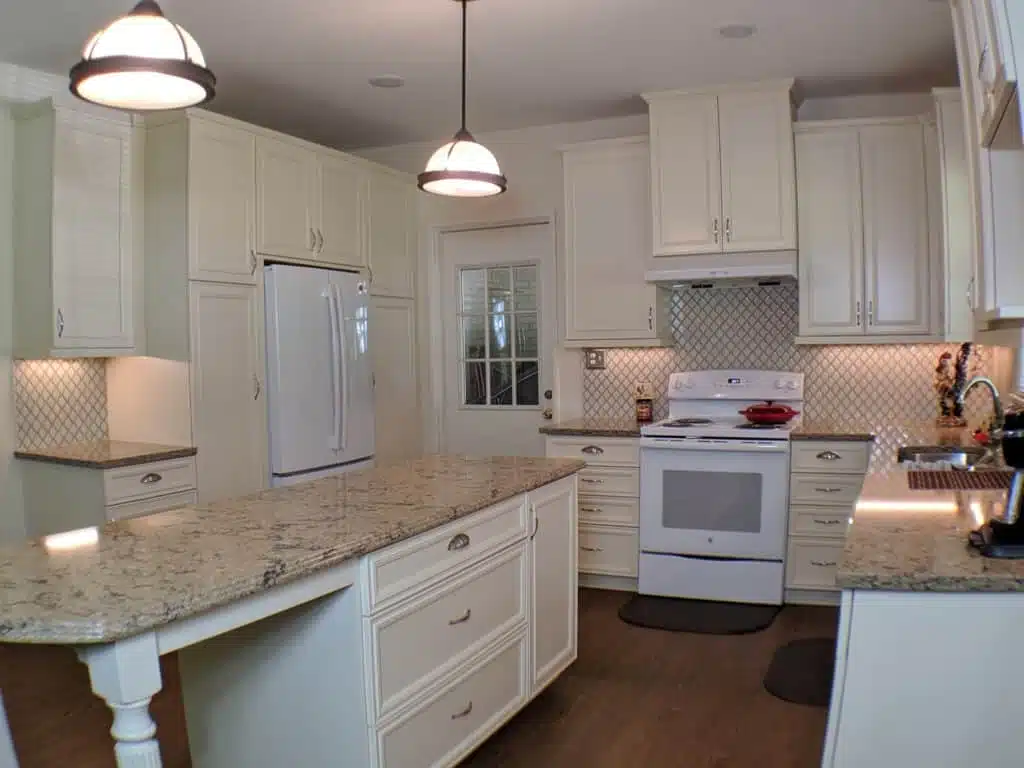
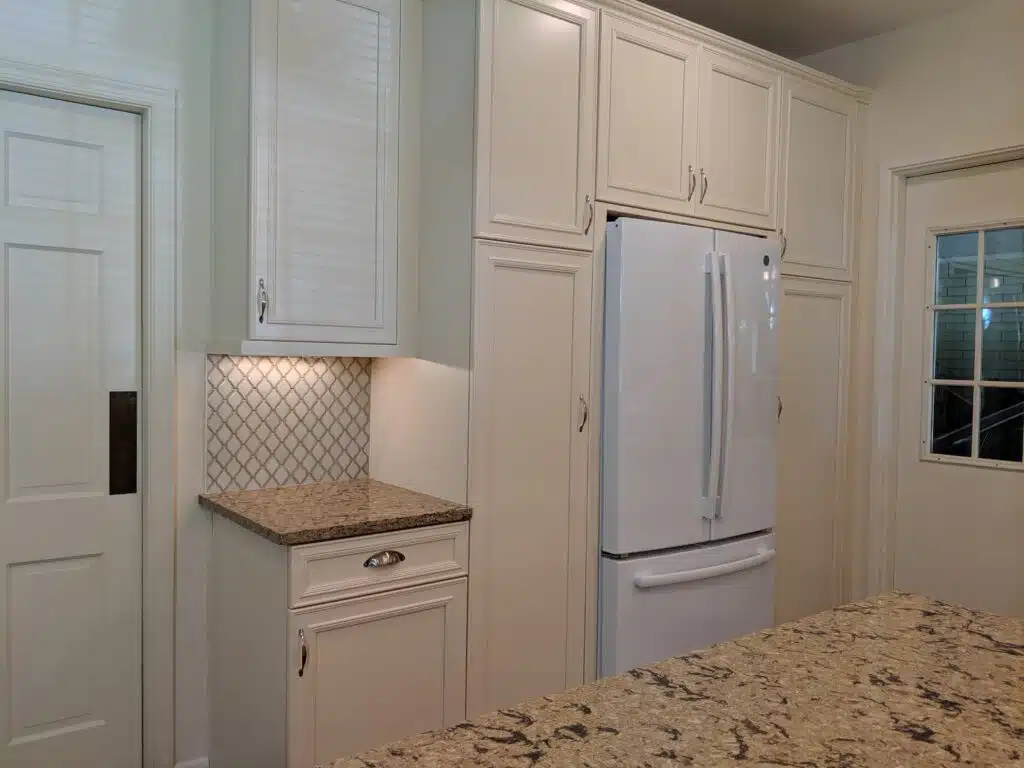
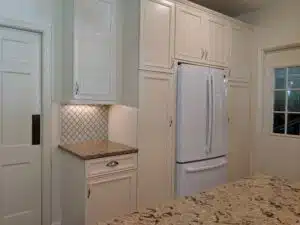
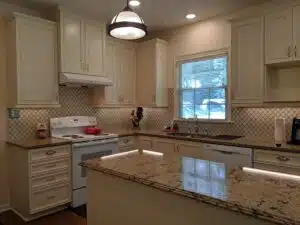
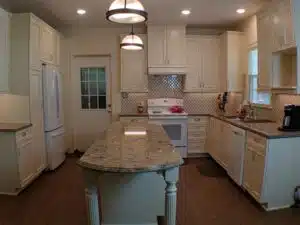
She was also worried about removing the peninsula cabinets because of the storage she would be giving up. We solved that issue by adding two tall pantry cabinets on either side of the fridge and a good sized island with large drawers and a trash pullout. Ultimately the new design has more storage, and more useful storage than the old layout.
The new frameless cabinets from Kith Cabinetry gave her the traditional look she wanted but also gave her more storage space because of the frameless design.
Adding an island also meant that their breakfast table would no longer fit where they had kept it for years. The solution was to add some seating at the end of the island. We use some turned wood legs to support the counter top and add another traditional element to the design.
To replace the tile we used Luxury Vinyl Plank. A wood look vinyl plank that is very popular these days. Its very durable and scratch resistant, is easy to install and 100% waterproof. It also has a little give to it so it is softer underfoot than tile and feels warmer under bare feet.
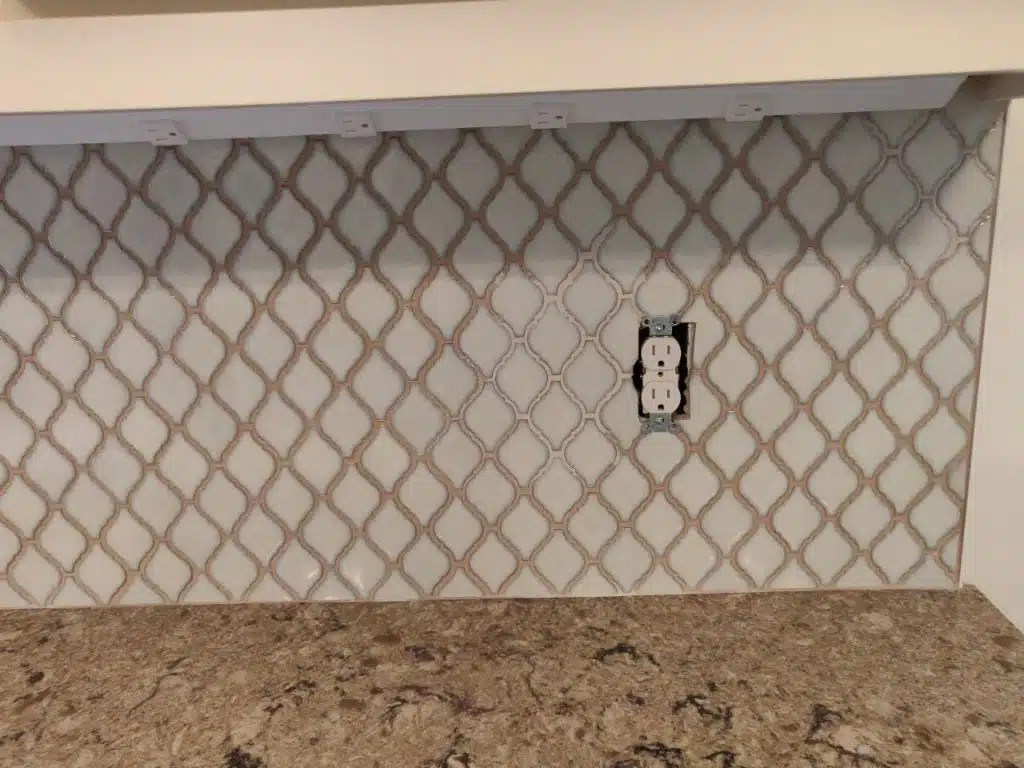
Where are the Plugs?
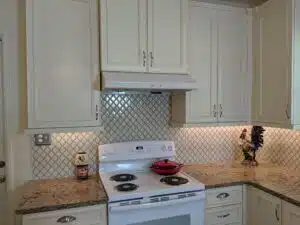
If you look close you might notice that you don’t see any outlets in the back splash. What gives? Instead of traditional outlets we used Angled Power Strips (APS) from Task lighting. These plugs go up under the cabinet and have a few advantages. One advantage is you get more plugs. A typical APS has 4 plugs where a traditional outlet only has 2. Another advantage is aesthetic – you don’t have unsightly plugs interrupting your beautiful tile back splash. A third advantage is the APS can have different kinds of plugs including USB, HDMI and Ethernet.
When you add an island to a kitchen the island also needs power. We used an angled power strip under the counter top overhang on this island to avoid having to cut holes for a plug in the side of the cabinet.
In the picture above you’ll notice there is one plug in the back splash. That is because that’s where the coffee make will live. Anytime an appliance will stay on the counter in the same spot we will use a traditional outlet because the appliance hides the outlet and the cord better.
Challenges
Adding An Island
Adding an island required cutting into the slab so we could run power to the island (building code requires fixed islands to have power). This was not a big deal but did add expense to the project.
Wiring
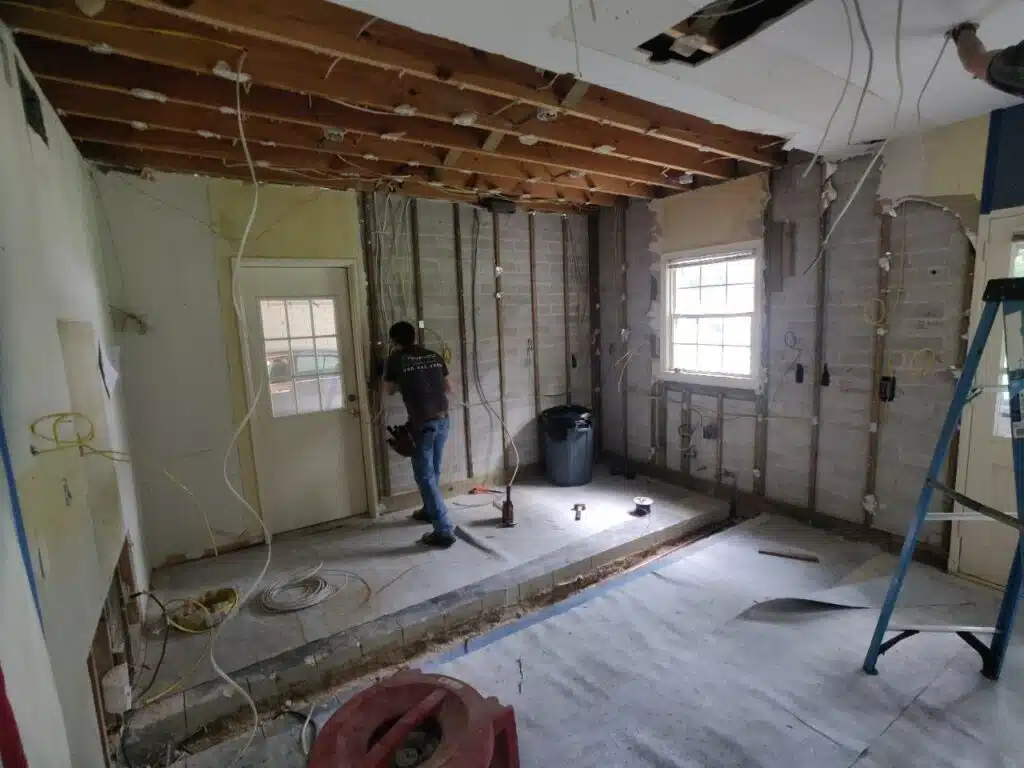
The wiring in the home was old cloth wiring, something we did not know until the electric work was started. This meant all the wiring in the kitchen had to be replaced. Normally this would not be a big deal but this home was made of solid concrete block which made running new wire very difficult. Ultimately we decided to just remove all the drywall on the walls and ceilings to allow for the new wiring to be done.
Fortunately this did not add much cost as we were anticipating issues due to the age of the home and had built a contingency into the project. There was some added cost due to the extra drywall work but that was minimal. The new wiring circuits in the kitchen are all on Arc Fault breakers and Ground Fault protected which reduces the chance of fire or shock. We also placed the microwave on a separate circuit to reduce the load on other plug circuits.
Plumbing
After the demo was complete we discovered that the ice maker line to the old fridge was not run properly and could not be reused. the plumber was actually surprised it had not yet leaked. Since we had already trenched the concrete to get power to the island we simple ran the trench all the way to the other wall so a water line could be properly run.
Before Pictures


After Pictures

Thank you for reading! We’d love to be a part of your next remodel. Check out our design services page
Paul McManus
Certified Residential Contractor, CRC1331326