![]()
McManus Kitchen and Bath provides a single place where you can work with interior design and construction professionals who can help you create a happy, healthy home. We start each project with a Design and Budget Consult. It will help you clarify your design ideas, understand the remodeling process and create a Good Better Best Budget for your project. Click Here to Schedule a Consult
__________________________________________________________________________________________________________________________
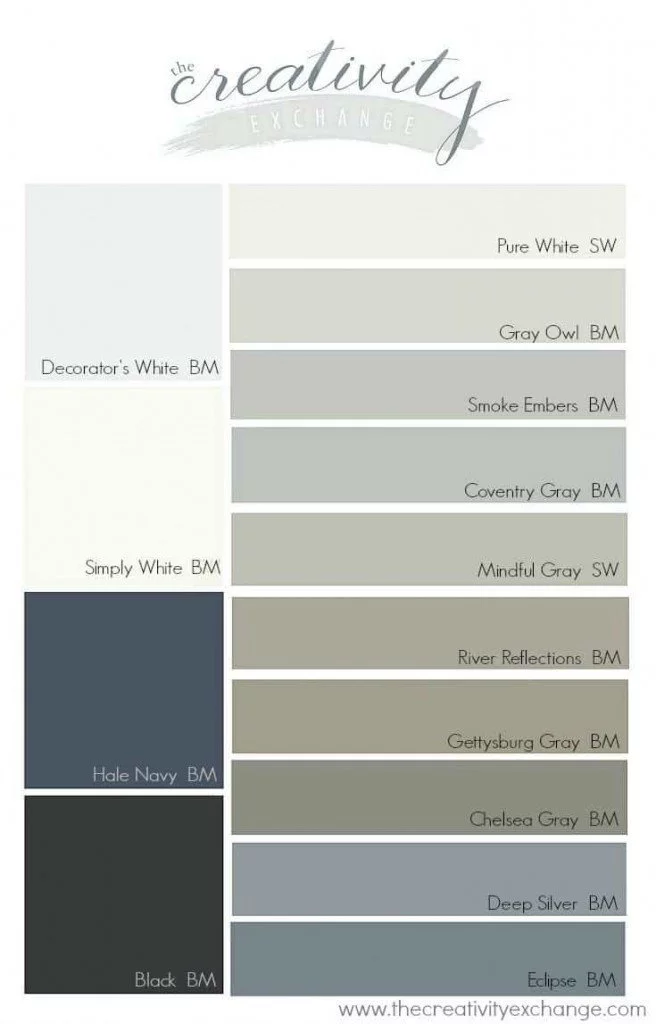
In a post on the Creativity Exchange Blog Cyndy highlighted some of the most popular colors for painting kitchen cabinets over the last couple of years. Be sure to jump over and check out her post for the details and lots of pictures of painted cabinets in all these wonderful colors.
Scroll to the bottom of this post for our cabinet painting how to.
The Best Colors for Painting Kitchen Cabinets
As you might have guessed most of the colors are “cool” in nature. powder blues and greys as well as olive colors. These paint colors go well with a lot of decor and are easy on the eyes. They are also pretty gender neutral so men and women both can usually agree on them.
Choosing colors for painting you kitchen cabinets is tricky and the process painting the cabinets is labor intensive so you don’t want to have to do it twice! Start with these selections of colors and bound to get it right the first time around.
Painting Kitchen Cabinets – How To
It should take a full weekend to paint your kitchen cabinets so plan accordingly. Wake up early Saturday or get your prep work done Friday afternoon. If you’re fast you can be done priming early Saturday afternoon in time to relax a little before starting on the finish coat on Sunday.
Step One: Prep
Lock up you pets, sweep and mop your kitchen floor and empty all the cabinets you intend on painting. Protect the floors and counters with drop cloths or craft paper… I like the drop cloths available over at www.dropcloth.com, they are made from recycled materials, are absorbent, waterproof and don’t slide around on hardwood floors or tile. They are the only drop cloths we use any more.
Painting kitchen cabinets is easier if you leave the doors on. I suggest removing the drawers and placing them on a work table for painting. You can also remove the doors but you’ll need a lot of space to lay them our for painting and you’ll only be able to paint on side at a time.
If you’re not an experienced painter then tape the hinges and other area’s you don’t want to get paint on. Remove all the pulls.
Consider painting the inside of your cabinets a bright color like red or yellow. Not only do those colors help show off your dishes it adds some interest every time you open you cabinet doors!
Don’t Skip Cleaning
The number one rule for painting kitchen cabinets is to make sure they are clean! Many people want to paint their kitchen cabinets because they look dirty or dingy but you can’t paint over dirt or stains or the paint finish will fail. Get out your all in one cleaner and give the cabinets a good washing. Make sure you rise off any soap residue as well.
Next step is to scuff the existing finish. Use some 220 grit sand paper to lightly sand all the surfaces you are going to paint. Wipe down the cabinets again to make sure there is no dust left on then from sanding.
Step Two: Prime
I know Home Depot sells an all in one paint and primer that they say allows you to skip the priming step. I just don’t believe them. Paint and primer are formulated very differently and to inlcude the properties of both in one can would mean compromising the quality of both. But a good quality primer from a local paint store like Eppes Paint and Decorating, our local Benjamin Moore Supplier. Not only will you get a good product but you’ll get expert advice as well.
Have them tint the primer to match the color of the finish you want.
Step Three: Paint
Allow the primer to dry overnight, give it a light sanding with 220 grit and then apply your finish coat (you may need to apply two finish coats, depending on your color choice). Gloss paint finishes are the most durable but that shine also highlight flaws in the wood. A semi gloss or satin maybe a better choice. Wait at least 8 hours between coats, lightly sand between coats as well.
Step Four: Reinstall the drawers and Hardware
Wait 24 hours before installing the hardware and reinserting the drawers. Even when the paint is dry to the touch it will still be soft and can be damaged by the pulls and drawers could stick to the finish. When I say 24 hours I mean a full 24 hours, not just over night.
Thank you for reading! We’d love to be a part of your next remodel. Check out our design services page
Paul McManus
Certified Residential Contractor #CRC1331326
